Ok. This video has a slow setup. But you have to watch this.
Saturday, June 12, 2010
Tuesday, April 27, 2010
Amazing Startup and Shutdown Speeds of Ubuntu 10.04
The following are videos showcasing the startup and shutdown speeds of Ubuntu 10.04 RC. What makes these videos even more impressive is that the computer used to demonstrate this test was a netbook pc.
Startup
Shutdown
Startup
Shutdown
Wednesday, April 7, 2010
Major surgery! My hack job on my network switch to make my life better
My switch has always been noisy. However starting yesterday it has been ridiculously loud thanks to an aging fan.
I pulled the switch off the wall and tore it apart to dig out the fan and dust everything off. Turns out I only had one fan the right size but it was obviously not powerful enough for the job. My other choice was to step up to a fan I keep stocked... the standard 80mm case fan.
.jpg)
I grabbed my trusty drill bit from back in the days where I would put 80mm and 120mm fans on the side of my case (they didn't come on the side back in those days.) and got to work.
.jpg)
I made sure I found a spot on the switch cover where I would have enough clearance with the internal components to fit the new fan. Then I got a punch and hammer to make an indent for my drill bit.
.jpg)
Ouch. As soon as the inner drill bit made it through the amazingly thick sheet metal, the bit grabbed and spun it right out of my hand cutting me in the process. I'll live, thanks for the concern.

Well it took a few minutes of drilling to get the bit all the way though, then I took fan grill (I stock them too) and used that to mark the location of the screw holes. Using the punch once more I made my indents, then drilled all the holes. The holes can be bigger than the screws if desired because the fan grill will actually be there to hold the screw.
.jpg)
Finally I put the fan and grill in place, had to adjust the wiring order on the fan plug (the old plug was reversed in polarity) hooked it all back up and tried it out. Now the switch is quieter than ever before!
.jpg)
I know a few potential issues with what I did.
That's all folks. And yes my network is a mess. I sure don't have time to clean that up.
I pulled the switch off the wall and tore it apart to dig out the fan and dust everything off. Turns out I only had one fan the right size but it was obviously not powerful enough for the job. My other choice was to step up to a fan I keep stocked... the standard 80mm case fan.
.jpg)
I grabbed my trusty drill bit from back in the days where I would put 80mm and 120mm fans on the side of my case (they didn't come on the side back in those days.) and got to work.
.jpg)
I made sure I found a spot on the switch cover where I would have enough clearance with the internal components to fit the new fan. Then I got a punch and hammer to make an indent for my drill bit.
.jpg)
Ouch. As soon as the inner drill bit made it through the amazingly thick sheet metal, the bit grabbed and spun it right out of my hand cutting me in the process. I'll live, thanks for the concern.

Well it took a few minutes of drilling to get the bit all the way though, then I took fan grill (I stock them too) and used that to mark the location of the screw holes. Using the punch once more I made my indents, then drilled all the holes. The holes can be bigger than the screws if desired because the fan grill will actually be there to hold the screw.
.jpg)
Finally I put the fan and grill in place, had to adjust the wiring order on the fan plug (the old plug was reversed in polarity) hooked it all back up and tried it out. Now the switch is quieter than ever before!
.jpg)
I know a few potential issues with what I did.
- The airflow will not be identical to the old fan but I did close off the old fan hole with clear tape to try to keep it close to original. A baffle inside the switch could be easily constructed with duct tape to direct the air in the exact same path it had before but I think this is close enough.
- The old fan was 5 volts and the case fan is 12 volts. From what little I understand this is not an issue, the fan will just turn slower than if it had all 12 volts.
- The old fan was .24a @ 5 volts. The new fan is .13a @ 12 volts. I'm not sure what the final draw is though since the new fan isn't actually running at 12 volts. I'm more concerned about startup current.
- Finally I know a larger fan moves more air at less rotations but I have no way of knowing if I am moving more or less air than before. I don't want to over heat.
That's all folks. And yes my network is a mess. I sure don't have time to clean that up.
Wednesday, March 24, 2010
DIY Personalized Email Marketing with OpenOffice.org for Free
The Problem and a Marketing Tip:
When I photograph a wedding, I will place cards on the tables for guests to write in their name and email address. I tell the guests that I will notify them as soon as the pictures are online. So far, guests are happy about it and they actually thank me for the doing this for them. I make a point to only mail once to avoid being spam-y. Well, I like the messages to list their name in the salutation. 'Hi Joe' just works better for me than something less personable. Tools and online services for this are expensive. So digging around I figured out how to do it with OpenOffice.org for FREE.
Keep reading if you want the techie details. If not, Follow Me, to get more photography and tech tips. This will be a long one. EDIT: These instructions are made for Ubuntu / Linux. You may need to adjust for windows.
Setup:

Create SpreadSheet:
Create spreadsheet with Row1 having column titles. Two columns you will likely need are Name and Email but feel free to have others.
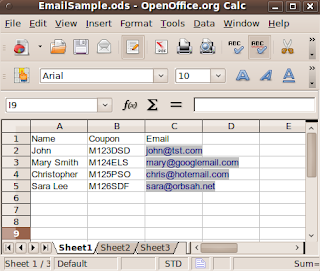
Create Message Template:

MailMerge Wizard:
Once you are done you can open the mail merge wizard. Tools, MailMerge Wizard. The wizard divides the task into 8 steps. Most of which you will skip.


If all goes well you will see a progress bar complete the sending. You should be able to check your Sent Items folder and see all the messages. If you mistyped any email addresses, you will probably get a failure notification by email just for the bad addressess.
Cleaning Up:
If you use this email marketing a lot, you may start to build a lot of databases. To remove databases from the OpenOffice list (this doesn't delete the database file):


Thanks for reading. Hopefully it all went smooth for you. I wish I could have found instructions like these when I started... Enjoy!
Ps. I've tried to include a small graphics in my emails, but they don't make it to the email system. If you are handy with HTML, it may be better to link to an internet hosted graphic.
When I photograph a wedding, I will place cards on the tables for guests to write in their name and email address. I tell the guests that I will notify them as soon as the pictures are online. So far, guests are happy about it and they actually thank me for the doing this for them. I make a point to only mail once to avoid being spam-y. Well, I like the messages to list their name in the salutation. 'Hi Joe' just works better for me than something less personable. Tools and online services for this are expensive. So digging around I figured out how to do it with OpenOffice.org for FREE.
Keep reading if you want the techie details. If not, Follow Me, to get more photography and tech tips. This will be a long one. EDIT: These instructions are made for Ubuntu / Linux. You may need to adjust for windows.
Setup:
- Ensure your default mail client is configured to handle mail. If you use webmail, configure your email client to be able to send to the web account before continuing.
- Setup Your Mail Merge Email account in OpenOffice Writer by choosing Tools, Options.
- Then expand the OpenOffice.org Writer settings.
- Finally click Mail Merge E-mail and fill in your values.

Create SpreadSheet:
Create spreadsheet with Row1 having column titles. Two columns you will likely need are Name and Email but feel free to have others.

Create Message Template:
- Create a letter you would like to send without names or other merged values.
- Put the mouse in the location you would like the first field.
- Goto Insert, fields, Other or press Ctrl-F2
- On the Database tab, select mail merge fields in the Type Box


- Click Browse and locate your spreadsheet.
- After choosing your spreadsheet, it should now appear in the list of databases.
- Expand the database and sheet1.


- Click on the field you want to use and click insert. the field should now appear in your document.

- Without closing the Fields window you can click in other areas of your document and insert other fields.
- You probably don't want to insert the email address into the message body. That will come later.
MailMerge Wizard:
Once you are done you can open the mail merge wizard. Tools, MailMerge Wizard. The wizard divides the task into 8 steps. Most of which you will skip.
- Step 1. Leave as Current Document.

- Step 2. Choose Email Message
- Step 3. Select your database for the address list.

- Step 4. Skip. You have already completed this by inserting fields. This part of the wizard is clumsy so we did it a better way.
- Step 5. Nothing to do here. It should be grayed out.
- Step 6. Nothing to do here, but you can click the arrows and actually see your data in your message template.

- Step 7. Nothing to do here, but at this point OpenOffice will create a new document with all your merged data. If you cancel now, it will close this temporary document, and take you back to your template.
- Step 8. Select the last option, Send merged document as E-Mail.
- For To: Select your email address field.
- For Subject: Type any Subject
- Send As: I leave as HTML, choose what you need.
- Click Send Documents

If all goes well you will see a progress bar complete the sending. You should be able to check your Sent Items folder and see all the messages. If you mistyped any email addresses, you will probably get a failure notification by email just for the bad addressess.
Cleaning Up:
If you use this email marketing a lot, you may start to build a lot of databases. To remove databases from the OpenOffice list (this doesn't delete the database file):
- Click on View, Datasources (or press F4).
- Right-Click in the database box and click Registered Databases.
- In the new window select the databases you created and delete them. Do not delete the databases the system created, such as Bibliography.

Thanks for reading. Hopefully it all went smooth for you. I wish I could have found instructions like these when I started... Enjoy!
Don't spam anyone and before sending a large list of emails ensure you follow the rules of your email provider or they may drop your account. For example, Gmail limits you to 500 emails per day. And if you get a large number of failed deliveries they may temporarily disable your account.
Ps. I've tried to include a small graphics in my emails, but they don't make it to the email system. If you are handy with HTML, it may be better to link to an internet hosted graphic.
Sunday, March 21, 2010
Change Default Operating System at Boot for Ubuntu
Suprisingly the solutions to this problem vary wildly. Ubuntu is using the new Grub2 for booting and not too many users know the proper way to change the boot order. However after digging through all the answers I have what I believe is the best solution.
My particular problem is because I just built a new i7 920 system for my grandfather. He paid for Windows 7, but at the last minute I talked him into trying an ubuntu dual boot. Part of this, however is I need windows 7 to be the default choice or he will get frustrated.
Well, here is the adventure. First, the old way to update the boot is by simply modifying menu.lst. This file no longer exists. Then the people who are used to this try updating grub.cfg, because it seems similar to menu.lst. However the system will build a new grub.cfg when it needs to and overwrite any changes.
The closest correct answer is modifying /etc/default/grub and changing GRUB_DEFAULT=0 to the correct number. However this will present problems if the grub list ever grows or shrinks, such as when a new kernel is installed.
I've seen a few other complicated, but unreliable options too. But I'm not going into all the the wrong ways. Lets look at the correct way to change the default boot item.
Step 1, Figure out the exact name of the OS you want to boot. Either write it down when you reboot or type this in a terminal
Copy and paste it or just write it down. Just make sure you get it exact, even the capitalization.
Step 2, open the /etc/default/grub file for editing, here is my favorite command:
Here is my GRUB_DEFAULT line for my grandfather's computer:
Last step! You need to update your grub menu (process the changes we made). Just type into a terminal:
That is it. Only 4 steps and a headache saver.
FYI, most of the wrong ways to update grub came from here: http://www.linux.com/community/blogs/changing-the-default-boot-with-ubuntu-910-grub-2.html, though this eventually led me to the right answer.
My particular problem is because I just built a new i7 920 system for my grandfather. He paid for Windows 7, but at the last minute I talked him into trying an ubuntu dual boot. Part of this, however is I need windows 7 to be the default choice or he will get frustrated.
Well, here is the adventure. First, the old way to update the boot is by simply modifying menu.lst. This file no longer exists. Then the people who are used to this try updating grub.cfg, because it seems similar to menu.lst. However the system will build a new grub.cfg when it needs to and overwrite any changes.
The closest correct answer is modifying /etc/default/grub and changing GRUB_DEFAULT=0 to the correct number. However this will present problems if the grub list ever grows or shrinks, such as when a new kernel is installed.
I've seen a few other complicated, but unreliable options too. But I'm not going into all the the wrong ways. Lets look at the correct way to change the default boot item.
Step 1, Figure out the exact name of the OS you want to boot. Either write it down when you reboot or type this in a terminal
cat /boot/grub/grub.cfgScroll up to find the name. Mine is 'Windows 7 (loader) (on /dev/sda1)'
Copy and paste it or just write it down. Just make sure you get it exact, even the capitalization.
Step 2, open the /etc/default/grub file for editing, here is my favorite command:
sudo nano /etc/default/grubIf you are more of a point and click person try this:
gksudo gedit /etc/default/grubStep 3, find the line with GRUB_DEFAULT=0 and change the 0 to your OS. Be sure to use double quotes around your OS because it has spaces in the name.
Here is my GRUB_DEFAULT line for my grandfather's computer:
GRUB_DEFAULT="Windows 7 (loader) (on /dev/sda1)"If you are trying to do this for windows 7, chances are your line will match mine exactly. Be sure to save your file and exit your editor.
Last step! You need to update your grub menu (process the changes we made). Just type into a terminal:
sudo update-grub
That is it. Only 4 steps and a headache saver.
FYI, most of the wrong ways to update grub came from here: http://www.linux.com/community/blogs/changing-the-default-boot-with-ubuntu-910-grub-2.html, though this eventually led me to the right answer.
Sunday, March 14, 2010
Get great prints locally in about an hour.
Ok, you've seen this everywhere. Prints ready in an hour...
Not all places are the same and few offer professional results. Currently my favorite place is Sam's Club. Yep. Odd as it sounds, they offer oustanding print quality thanks to their Fuji Frontier Printer.
I have completly stopped using an inkjet as the quality wasn't there and it actually costs more to print at home. I had an Epson R1800 . One of the better professional Epson printers. I constantly had headaches with that printer and it's need to clean itself more than my cat.
There are many places to get prints, I've tried them all and I am not happy with the in an hour quality. But next time you are in a jam, try a Sam's Club or possibly WalMart.
If you are in a huge rush, upload ahead of time and get them printing on your way there. You can also checkout at the photo station meaning you don't have to get in the long lines.
Enjoy.
Not all places are the same and few offer professional results. Currently my favorite place is Sam's Club. Yep. Odd as it sounds, they offer oustanding print quality thanks to their Fuji Frontier Printer.
I have completly stopped using an inkjet as the quality wasn't there and it actually costs more to print at home. I had an Epson R1800
There are many places to get prints, I've tried them all and I am not happy with the in an hour quality. But next time you are in a jam, try a Sam's Club or possibly WalMart.
If you are in a huge rush, upload ahead of time and get them printing on your way there. You can also checkout at the photo station meaning you don't have to get in the long lines.
Enjoy.
Saturday, March 13, 2010
How to keep your eye balls
This is something new I've started doing to all my cameras. Fast and simple. All my camera straps seem to have about an inch of strap which tends to poke my eye when I rotate the camera. Ouch. I know this sounds silly, but it happens.
Finally it frustrated me enough. I grabbed my Gaffers tape and went to work. For a 2 second fix, I don't know why I didn't do it earlier.
Here is a picture of the fix.

BTW: if you don't have any gaffers tape, buy some now. It's the best stuff in the world. It tears easy so you don't need scissors, its super strong like duct tape, and it's removable and reusable without leaving a residue. Duct tape used to be my tape of choice, but not any more.
Finally it frustrated me enough. I grabbed my Gaffers tape
Here is a picture of the fix.
BTW: if you don't have any gaffers tape
Friday, March 12, 2010
Loving my new camera... Olympus E-PL1
My friend ditched his rebel and bought an Olympus Pen. I told him he was crazy. Then he started a blog about his camera (Though he is slow to add content sometimes). His images looked great with no editing.
So life goes on and I buy a Canon s90 for my 'casual' shooting. My problem was although the s90 provides the best image you can get in that pocket size, I am too used to SLR quality. I was never happy. Finally I am at a shoot and another photographer was using a Leica Point and Shoot
 . It got me excited when he touted the quality. However after some research it's no better than the s90 unless you get the $2000 fixed focal length P&S leica. My wife would kill me.
Well after a lot of research, Micro 4/3 options ended up being the best option. Noise, image quality, hot shoe, it's all there. There was a trade in size, as it's not as micro as it sounds, but still not an SLR. Here is a picture of the Micro 4/3 camera with kit lens vs. a 30D with 50mm 1.4

As you can see, I went out and bought the camera right away. This has the wife pissed at me, but at least I'm not dead. I had to look for a while to find the Olympus E-PL1 camera locally. It's hard to find right now, in fact all micro 4/3 stuff seems to be hard to get so don't expect any deals, even online. I checked dozens of stores and only Ritz of all places had one in stock.
The quality of the camera's images are great. I don't want to post process this kind of casual shooting, I just want to take pictures. I also don't believe in getting a lot of lenses for this camera as that would destroy the portability. However I do plan to get a lens that I will leave on somewhat permanently (the Panasonic 20mm f/1.7 ) This lens is even smaller than the lens above and with a lens this fast I should not need any flash.
The E-PL1 has it's downsides, no view finder, no knobs and dials for fast adjustment, not yet compatable with adobe, etc. However it does have Image Stabilization in body, outstanding image right out of the camera, and a low cost (relative).
Well, I'm cutting this off as I always ramble. Here is a link to some sample pictures.
So life goes on and I buy a Canon s90
Well after a lot of research, Micro 4/3 options ended up being the best option. Noise, image quality, hot shoe, it's all there. There was a trade in size, as it's not as micro as it sounds, but still not an SLR. Here is a picture of the Micro 4/3 camera with kit lens vs. a 30D with 50mm 1.4
As you can see, I went out and bought the camera right away. This has the wife pissed at me, but at least I'm not dead. I had to look for a while to find the Olympus E-PL1
The quality of the camera's images are great. I don't want to post process this kind of casual shooting, I just want to take pictures. I also don't believe in getting a lot of lenses for this camera as that would destroy the portability. However I do plan to get a lens that I will leave on somewhat permanently (the Panasonic 20mm f/1.7
The E-PL1 has it's downsides, no view finder, no knobs and dials for fast adjustment, not yet compatable with adobe, etc. However it does have Image Stabilization in body, outstanding image right out of the camera, and a low cost (relative).
Well, I'm cutting this off as I always ramble. Here is a link to some sample pictures.
Thursday, March 11, 2010
How to get a leg up in photography
Sometimes it helps if you could just shoot over the crowd, or get slightly higher than your subject.
In comes my best find ever.

A 9" high collapsible step which holds up to 300lbs. I've used this one for two years now and it's still going strong. Looks like they come in red or black as well.
Here is the stool collapsed:

It's very nice and the 9" boost really helps me. I have also used it as a posing tool. Here are all the uses I have found.
 it's gotta be one of the cheapest photographic tools that you can throw in your trunk.
In comes my best find ever.
A 9" high collapsible step which holds up to 300lbs. I've used this one for two years now and it's still going strong. Looks like they come in red or black as well.
Here is the stool collapsed:
It's very nice and the 9" boost really helps me. I have also used it as a posing tool. Here are all the uses I have found.
- Have todlers sit on it
- Have the model put a foot on it to shift the body.
- Get above the model's eye level to get them to lift their chin a little.
- Get above the crowd surrounding the bride and groom to get cool wide angle shots.
- Get a little higher to avoid heads in the shot
- Use it to reach a little higher to hang a backdrop, adjust a light, etc.
- And I'm sure there are more.
Wednesday, March 10, 2010
How to control the orange.
When photographing indoors we are faced with many challenges. One of those challenges is low lighting. This is where the flash comes in. However this flash presents another challenge... Orange backgrounds.
Various lights output different colors. Florescent lights output green, and your typical incandescent light bulb puts out orange. The flash on your camera is designed to be closer to natural daylight, but even that is variable.
So when you take a picture using flash in a room with a lamp, you have to make a choice. The surfaces being lit by the lamp can look orange, or the surfaces lit by the flash can look blue. If your camera is set to auto, it will automatically favor the flash.
So how do I fix it?
If you are dealing with florescent lights all the same applies but you will use a green gel instead.
Here is a photograph of my flash with the Gel on it.

I made the gel myself. (sorta) I bought the plastic in a large sheet. I cut it to fit and I put Velcro on it.
Here is a photo of how I store my gel so it is always ready to go.

That's it. When I need it, I put the Gel over the front of the flash. On my flash I have a velcro strap for attaching accessories. Its not glued to the flash so it is easily removed if needed.
There are many more pictures showing my equipment here including close-ups of the gels, and other configurations.
Stay tuned. Over the next several days I am posting practical photography tips.
Various lights output different colors. Florescent lights output green, and your typical incandescent light bulb puts out orange. The flash on your camera is designed to be closer to natural daylight, but even that is variable.
So when you take a picture using flash in a room with a lamp, you have to make a choice. The surfaces being lit by the lamp can look orange, or the surfaces lit by the flash can look blue. If your camera is set to auto, it will automatically favor the flash.
So how do I fix it?
- Use one type of light.
- Turn off the lamps and just use flash (the space that would have appeared orange will now be close to black.)
- Turn off the flash and just use the lamps. You will need a good fast lens and high ISO settings.
- Make the flash match the lamps
- You can put orange plastic on top of the flash to make it match the lamp color. Then you force the camera to use tungsten (usually a little light bulb icon) The orange plastic sheet is called a gel.
If you are dealing with florescent lights all the same applies but you will use a green gel instead.
Here is a photograph of my flash with the Gel on it.
I made the gel myself. (sorta) I bought the plastic in a large sheet. I cut it to fit and I put Velcro on it.
Here is a photo of how I store my gel so it is always ready to go.
That's it. When I need it, I put the Gel over the front of the flash. On my flash I have a velcro strap for attaching accessories. Its not glued to the flash so it is easily removed if needed.
There are many more pictures showing my equipment here including close-ups of the gels, and other configurations.
Stay tuned. Over the next several days I am posting practical photography tips.
Tuesday, March 9, 2010
1024bit RSA cracked in 100 hours. What is coming next?
Here is a very technical read on the attack used on RSA http://www.eecs.umich.edu/~valeria/research/publications/DATE10RSA.pdf. I made it about half way though, see how far you can go... lol. Anyways the summary is by messing with the voltage supply they are able to introduce single bit errors into the RSA algorithm, then they can take these bad outputs and analyze them to reveal the secret key.
They are able to do this without modifying or accessing the internal system components. So in effect the attack leaves no signs of tampering. They performed this particular attack against linux and OpenSSL.
WOW. Just remember security isn't about how strong your front door is.
They are able to do this without modifying or accessing the internal system components. So in effect the attack leaves no signs of tampering. They performed this particular attack against linux and OpenSSL.
WOW. Just remember security isn't about how strong your front door is.
Monday, March 1, 2010
Two ways to find out who is selling your info.
Gmail has two features which will allow you to monitor who is selling your information. Nearly everyday I find a site that requires registration and it gets annoying. More annoying is revealing my email address to these sites. I used to use multiple addresses but it became annoying to check all of them. So here are two tips for giving out multiple email addresses via Gmail. These addresses can be later filtered if they become too spammy.
Plus Addressing
I've seen this one mentioned alot. Plus addressing allows you to append anything you want to your email address by using a plus sign. So if my name is john@gmail.com, I can sign up to a site with john+somesite@gmail.com. The plus sign is a valid email character. Unfortunately many site registration forms don't allow it. However this is the first thing I try to do every time. If I start getting spam from other companys to john+somesite@gmail.com, then I know who sold me and I can filter that address from going to my inbox.
Dot Addressing
Not as flexible as plus addressing and harder to know which site sold you. However this can be a great way to filter spam. Gmail ignores periods (.) in email addresses. You can't start or end your address with a period and you can't have two in a row, but you can have as many as you want. The best part about this method is I have yet to find a site that won't accept a period in an address. So jo.hn@gmail.com is valid, jo.h.n@gmail.com is valid as well. Obviously longer email addresses have more choice. You are limited here but I would suggest grouping sites by level of trust. So some site you randomly visit that you feel you must sign up for to post a comment and you know you will never be back, put the period in the first position, j.ohn@gmail.com. A site you plan to use all the time would perhaps get a period in the last position. Or whatever you decide. If you have a 6 character email address you have 31 alternates available. An 8 character email address has 256, but then with so many choices you will need a way to keep track. I would just use three or four at a time and change them as they start getting abused.
Both of these schemes work out of the box with gmail, though the dot technique does not work for gmail for your domain addresses. There is no pre-registering the addresses you plan to use. Go ahead, mail something to yourself at some random plus address. Keep in mind there is a maximum length to an email address, so don't go crazy. Other email providers allow plus addressing or other choices as well. You can get more specifics here: http://en.wikipedia.org/wiki/E-mail_address
Wednesday, February 24, 2010
My favorite online comic - xkcd
I don't read it everyday, but I'll check it out and read backwards to catch up. Well while going through all the recent comic strips, I found one that applies well to linux. Enjoy.
http://xkcd.com/694/
http://xkcd.com/694/
Tuesday, February 23, 2010
I'd like to share my annoyance with Ubuntu
Ubuntu is a superb replacement for windows. The hardest part about using a new system though is getting used to it's quirks. Windows has a ton of quirks but we've all had it for so long we are used to them. So I use Ubuntu on a daily basis and I'm used to the quirks, there aren't that many. When I am forced to use windows (@ work) the quirks I was once used to and accepted now annoy me more than anything Ubuntu may put me through.
So to say the least, I'm not giving up Ubuntu, but just sharing some of the what to expect.
I use an internal USB card reader to get my digital files off my camera and into the computer. A few days ago I had several memory cards to copy. I got through the first one, right clicked on the card and chose eject. On to the next one, when finished I ejected it too. On the last card my mouse slipped and I clicked 'Safely Remove Hardware'. Wow, this 50 pixel slip caused the entire card reader to be removed from the system. The only way to recover after this is a REBOOT.
It seems that this 'Safely Remove' Option was added here:
https://bugs.launchpad.net/ubuntu/+source/linux/+bug/404185
Now it's causing more bug reports to show up:
https://bugs.launchpad.net/ubuntu/+source/nautilus/+bug/525190
https://bugs.launchpad.net/ubuntu/+source/gvfs/+bug/504440
I don't see the point in allowing the entire reader to be disconnected. I mean there is no data to loose on a reader. The original solution seems to be about making ipod and kindle users happy. They also seem to be focused on determining if the drive/reader is internal or external as a solution. Even if it was external, I wouldn't want to unplug and replug the reader every time I switched cards.
A suggested solution (perhaps easier said then done).
Have a single Eject option. Don't completely remove the hardware/reader from the USB bus. However allow devices to be identified in the USB manager or nautilis to be flagged as 'Remove Completely' on a user preference basis. And automatically flag the kindle and the ipods, but still allow the user to unselect this as the option later for these devices. Any flagged device should then be completely removed when 'Ejected'. Then the majority of devices are simply unmounted without causing the user a lot of pain.
Well, that's my Ubuntu pain of the month. Surprisingly while trying to find the solution, I came across windows users with a similar problem. It surprised me to find windows problems in the first page of google results although I included 'Ubuntu' as a keyword.
Monday, February 22, 2010
Slow times. Or Not.
I have not posted in a week due to so much happening in my life at the moment. I am hoping to get right back into the daily blog posts to keep both of my readers informed :).
Coming up in the linux/Ubuntu world I plan on discussing
For photography I am mostly going to show some of my results from recent shoots.
So stay tuned, there is a lot to come. I'm also open to suggestions too.
Coming up in the linux/Ubuntu world I plan on discussing
- MP4ize script which easily converts videos to MP4 files. This is great if you have an Apple device.
- Media Server solutions and what I ended up with.
- Nightly FTP Off site backup solution
- My efforts with the Ubuntu MD team and our upcoming free workshops to introduce the locals to open source software.
For photography I am mostly going to show some of my results from recent shoots.
- Cub Scouts team shots at a local elementary school
- Modeling Shots at A. Salon in DC
- Children in my home studio
- And perhaps some pregnancy shots in my home studio
So stay tuned, there is a lot to come. I'm also open to suggestions too.
Wednesday, February 17, 2010
Introduction Of Guest Writer: Dr. Watson
As a guest writer on Techorator I will hopefully be adding value to this blog by incorporating my own flavor and style of writing. Like John, I am huge tech geek who loves to try new things and share the experience with others. So not to bore you will more useless background information, I will get right to the meat: I have decided to spend my time reviewing Ubuntu 10.04 Lucid Lynx. As 10.04 is a work in progress (currently Alpha 2), I will share my journey into this release exposing the changes as they are made and hopefully enlightening followers, guests, and passersby along the way.
Monday, February 15, 2010
How to clean up Google Chrome on Ubuntu 9.10
If you saw my post yesterday you will know I wasn't happy about the 39 new packages Google Chrome decided to install. I have a command that will clean the mess up for most ubuntu desktop systems.
sudo apt-get autoremove bsd-mailx g++-4.4 dpkg-dev
Make sure you don't actually use any of these packages. If you do, adjust the command to just get rid of what you don't need.
I went through all the packages that were installed and this command takes them all out plus Google Chrome itself.
No more open ports for my desktop system. Just the way I like it.
sudo apt-get autoremove bsd-mailx g++-4.4 dpkg-dev
- dpkg-dev gets rid of the bulk (30+ packages) including alien, rpm and QT.
- bsd-mailx gets rid of the mail server stuff like postfix
- g++-4.4 cleans up one or two odds and ends.
Make sure you don't actually use any of these packages. If you do, adjust the command to just get rid of what you don't need.
I went through all the packages that were installed and this command takes them all out plus Google Chrome itself.
No more open ports for my desktop system. Just the way I like it.
Sunday, February 14, 2010
No thank you google! Chrome automatically installs a mail server.
I just updated my Ubuntu desktop system and I didn't read the list of updates first. I swear this is the first time I didn't read the list and boy has it bitten me. I currently have the Google Chrome repo (http://dl.google.com/linux/deb/ stable main) on my system and it has really done it now.
Chrome has installed the following new packages on my system:
WOW that is a lot of junk I didn't want. The most concerning to me is the unwelcomed mail server. Yes. anyone who updated their desktop system and is using the Chrome repo is now running a mail server. Complete with port 25 open.
Arggg. Now I have to rip this stuff out of my system, hope I don't break anything and say good-bye to Chrome.
Chrome has installed the following new packages on my system:
- alien (8.78)
bsd-mailx (8.1.2-0.20081101cvs-2ubuntu1)
build-essential (11.4)
cvs (1:1.12.13-12ubuntu1)
debhelper (7.3.15ubuntu3)
dpkg-dev (1.15.4ubuntu2)
g++ (4:4.4.1-1ubuntu2)
g++-4.4 (4.4.1-4ubuntu9)
gettext (0.17-8ubuntu2)
html2text (1.3.2a-14)
intltool-debian (0.35.0+20060710.1)
libmail-sendmail-perl (0.79.16-1)
libqt4-assistant (4.5.3really4.5.2-0ubuntu1)
libqt4-dbus (4.5.3really4.5.2-0ubuntu1)
libqt4-designer (4.5.3really4.5.2-0ubuntu1)
libqt4-gui (4.5.3really4.5.2-0ubuntu1)
libqt4-opengl (4.5.3really4.5.2-0ubuntu1)
libqt4-script (4.5.3really4.5.2-0ubuntu1)
libqt4-sql (4.5.3really4.5.2-0ubuntu1)
libqt4-sql-sqlite (4.5.3really4.5.2-0ubuntu1)
libqt4-svg (4.5.3really4.5.2-0ubuntu1)
libqt4-xml (4.5.3really4.5.2-0ubuntu1)
librpm0 (4.7.0-9)
librpmbuild0 (4.7.0-9)
librpmio0 (4.7.0-9)
libstdc++6-4.4-dev (4.4.1-4ubuntu9)
libsys-hostname-long-perl (1.4-2)
lsb (4.0-0ubuntu5)
lsb-core (4.0-0ubuntu5)
lsb-cxx (4.0-0ubuntu5)
lsb-desktop (4.0-0ubuntu5)
lsb-graphics (4.0-0ubuntu5)
m4 (1.4.13-2)
mailx (1:20081101-2ubuntu1)
ncurses-term (5.7+20090803-2ubuntu2)
pax (1:20090728-1)
po-debconf (1.0.16)
postfix (2.6.5-3)
rpm (4.7.0-9)
WOW that is a lot of junk I didn't want. The most concerning to me is the unwelcomed mail server. Yes. anyone who updated their desktop system and is using the Chrome repo is now running a mail server. Complete with port 25 open.
Arggg. Now I have to rip this stuff out of my system, hope I don't break anything and say good-bye to Chrome.
Friday, February 12, 2010
Wow. Now this would be a great mini server!
I'm a little slow catching some news, but looking at the specs of the Fit-PC2i has me amazed. This tiny computer (4"x4.5"x1") packs a 1.6ghz Atom processor, two LAN, one wifi, a 2.5" drive bay and more. It only consumes 6 watts of power and has everything you need to setup your own firewall, router, or an Ubuntu FTP server ;). You are going to have to wait a little unless you can settle for the Fit-PC2. The older model doesn't have dual lan ports, but is nearly the same machine.
http://www.fit-pc.com/web/fit-pc2/fit-pc2i-specifications/
http://www.fit-pc.com/web/fit-pc2/fit-pc2i-specifications/
Thursday, February 11, 2010
Quick Studio Update
I bought a dowel rod and two wood curtain holders from Homedepot. Now I have hung my seamless. The seamless had to be cut to fit the room and I was able to accomplish that with a coping saw.


Wednesday, February 10, 2010
My studio is almost ready.
I've been working on clearing space in my house for a studio. I've finally done it and I can say that there is something nice about having a more permanent space for studio work. Here is a shot of the studio setup. I'd shoot it wider but my I'm not quite done so it's tight right now.

What I still need is a way to hang backdrops in a more accessible manner. Right now I'm just using my backdrop stand but it is limited. I'm thinking of getting one of these instead and keeping several backdrops ready to go.
The other part of a studio I want is a place for a roll of seamless paper . Unfortunately I need a way to hang it and I need a special size. I don't have 107" in width. I plan on buying a roll and cutting it to the size I need.
Finally I am going to place a hook or something on the ceiling to hang a hairlight. Ohh when it is completed it will be awesome.
Ahh, just for fun, I took a picture of myself. Yes, f5.6 at arms length is not enough.

Then I turned off a light and put on a gelled background light for my son.


What I still need is a way to hang backdrops in a more accessible manner. Right now I'm just using my backdrop stand but it is limited. I'm thinking of getting one of these instead and keeping several backdrops ready to go.
The other part of a studio I want is a place for a roll of seamless paper
Finally I am going to place a hook or something on the ceiling to hang a hairlight. Ohh when it is completed it will be awesome.
Ahh, just for fun, I took a picture of myself. Yes, f5.6 at arms length is not enough.

Then I turned off a light and put on a gelled background light for my son.

Photo tip of the day, when shooting kids always wipe their faces. I just don't know if its a rule or what but every kid has a koolaid smile or chip crumbs on their face.
Tuesday, February 9, 2010
Mini-server follow-up.
I got my mini server together and everything is working right. I noticed the motherboard had a capacitor that obviously struck the heatsink and I worried that the board may have been DOA. I decided to try it anyways and luckily it all worked.
The Rosewill case I ordered from newegg is nice. It is very cramped after getting it all in there but it fits. I realized Rosewill designed the case to easily accept a 2.5" harddrive as well and I would recommend that instead of the 3.5" WD Blue. The Blue drive is wonderful and cool, but it just makes this case that much more tight. The only gripe I have about the case is the CD rom bay is uncovered. If you don't put in a CD, when you push the front latch you will be greeted with a big hole in your case.
Power. One of the reasons I wanted the smaller computer was to save power over the old computer. The old computer was a Dell Dimension E520 (Intel Core 2 Duo, etc). The Dell is nice except it is huge and it sucks some power. According to my killawatt the dell sucked 90 watts at peak, and 65 watts idle. The new computer sucks 30-35 watts consistently. I was surprised actually by the low wattage of the dell. But I still have a savings and a lot more space!

Thanks for reading.

The Rosewill case I ordered from newegg is nice. It is very cramped after getting it all in there but it fits. I realized Rosewill designed the case to easily accept a 2.5" harddrive as well and I would recommend that instead of the 3.5" WD Blue. The Blue drive is wonderful and cool, but it just makes this case that much more tight. The only gripe I have about the case is the CD rom bay is uncovered. If you don't put in a CD, when you push the front latch you will be greeted with a big hole in your case.
Power. One of the reasons I wanted the smaller computer was to save power over the old computer. The old computer was a Dell Dimension E520 (Intel Core 2 Duo, etc). The Dell is nice except it is huge and it sucks some power. According to my killawatt

Thanks for reading.
Monday, February 8, 2010
TLS support for Pure-FTP Server
Here are the final steps in my series on setting up Pure-FTP in Ubuntu.
Again, connect to your server via putty or open a terminal and switch to root.
Then follow these commands below.
echo 1 > /etc/pure-ftpd/conf/TLS
You can set this to 0 for off, 1 for optional, and 2 for required. My goal is to reach 2 but my clients aren't ready for that.
Install OpenSSL package.
apt-get install openssl
The command below creates an encryption key for your ftp. Several questions will be asked
openssl req -x509 -nodes -newkey rsa:1024 -keyout /etc/ssl/private/pure-ftpd.pem -out /etc/ssl/private/pure-ftpd.pem
Here are example choices for a Key.
Country: US
State: Maryland
Locality: Columbia
Organization Name: ftp
Organization Unit: blank
Common Name: ftp
Email Address: blank
Lock the key file from other users.
chmod 600 /etc/ssl/private/pure-ftpd.pem
Reboot your server and now you should be able to connect to your server with encryption on. This is an easy step if everything goes well. Your choice is to decide between 1 and 2 for the TLS option. If you decide to use 2, you must know who your users are so you can guide them through setting up their client. If this is a personal FTP then it is no problem.
Well I hope you are enjoying your FTP server now. Good Luck.
Sunday, February 7, 2010
Creatively using mount to handle SMB shares for Pure-FTP
This portion will walk you through mounting SMB shares. I do some things differently for a more complex layout. But in the end it's worth it. I also use a credentials file to protect my share user accounts. Again, get to your server as Root.
Install smbfs so you can mount these network shares:
apt-get install smbfs
Go to the /mnt folder. Some may prefer media, but I like to reserve that for less permanent shares.
cd /mnt
create a folder for each network share
mkdir music
mkdir video
mkdir work
Give ownership of your share folders to the ftpgroup. This shouldn't matter because these folders will end up with the permissions given by the mount settings.
chown -R nobody:ftpgroup .
---Note: The period at the end is intentional
Create credential files to protect mounted accounts. The credential files are sensitive to spaces and line feeds. Just fill it in exactly as below.
nano music.cred
username=shareuser
password=thisisapassword
Save and exit.
nano video.cred
username=videouser
password=morepasswords
etc.
restrict credential files. You need to make it so only the root account can read these files.
chmod 600 *.cred
Now lets permanently mount some of these shares:
nano /etc/fstab
Add the following to the bottom of the file, noperm (no permission checking) on the first line is recommended for any share which the user will upload/write into. ro shares (read only) shouldn't need this.
//worldbook-work/work /mnt/work cifs credentials=/etc/work.cred,rw,uid=65534,gid=2001,noperm 0 0
//worldbook-media/music /mnt/music cifs credentials=/etc/music.cred,ro,uid=65534,gid=2001 0 0
//worldbook-media/video /mnt/video cifs credentials=/etc/video.cred,ro,uid=65534,gid=2001 0 0
# These following lines bind the mounts to our FTP folders.
/mnt/music /var/ftp/media/music none bind 0 0
/mnt/video /var/ftp/media/video none bind 0 0
/mnt/work /var/ftp/work none bind 0 0
/var/ftp/work /var/ftp/workmedia/work none bind 0 0
/var/ftp/media /var/ftp/workmedia/media none rbind,_netdev,noauto 0 0
Because /var/ftp/workmedia/media relies on another nested mount the timing of the mounts prevents the mount from working right away. To solve this I added some lines to rc.local to force mounting again at login.
nano /etc/rc.local
before exit 0 add these lines.
sleep 10
/bin/mount -a -t cifs
sleep 5
/bin/mount /var/ftp/workmedia/media
Exit and Save.
Reboot and go to your var/ftp (or other mount folder) and see if it worked.
You may notice that I bind my shares into the FTP folders instead of mounting them right there. This is done because my FTP folder is for FTP, but the mount folder is for any purpose. If I decide my FTP server will also serve as a DLNA media server then I have nothing else to do but point the dlna server to my mount folder.
Saturday, February 6, 2010
HOWTO: Setup Virtual Users with shared folder access on Pure-FTP in Ubuntu 9.10
This post assumes you have already setup pure FTP and ubuntu server 9.10. If you have not, go read my earlier posts. Start by logging into the server and switching to root.
If you haven't already, make sure pure-ftp supports the database file for virtual users.
ln -s /etc/pure-ftpd/conf/PureDB /etc/pure-ftpd/auth/50pure
Restart your FTP server process or just reboot.
Create an FTP group account and 2 shared accounts for users. Users will get individual virtual accounts.
groupadd -g 2001 ftpgroup
useradd -u 2010 -s /bin/false -d /bin/null -c "pureftp limited access user" -g ftpgroup ftplimited
useradd -u 2011 -s /bin/false -d /bin/null -c "pureftp full access user" -g ftpgroup ftpfull
Create a set of directories for the FTP files and to serve as chroot access points. I create a mess of folders for my purposes. You can read about my goals in an earlier post.
cd /var
mkdir ftp
cd /var/ftp
mkdir dropbox
mkdir work
mkdir media
cd media
mkdir music
mkdir video
cd /var/ftp
mkdir workmedia
cd workmedia
mkdir work
mkdir media
cd /var/ftp
chown -R ftpfull:ftpgroup /var/ftp
chmod -R 755 /var/ftp
chmod 735 /var/ftp/dropbox
Lets add some users:
Joey - dropbox user, SLOW download (he shouldn't need to download anyways.)
pure-pw useradd joey -u ftplimited -g ftpgroup -d /var/ftp/dropbox -t 1
Make up a password for joey at the next prompt.
Pam - Dropbox admin, normal download, but slow upload
pure-pw useradd pam -u ftpfull -g ftpgroup -d /var/ftp/dropbox -t 200 -T 1
Mr. Smith - Work user, normal download speed, unlimited upload
pure-pw useradd smith -u ftpfull -g ftpgroup -d /var/ftp/work -t 250
Dave - Media user, normal download speed, unlimited upload
pure-pw useradd dave -u ftplimited -g ftpgroup -d /var/ftp/media -t 250
ME. No speed limits.
pure-pw useradd john -u ftpfull -g ftpgroup -d /var/ftp/workmedia
After adding/modifying users you must issue this command to commit them.
pure-pw mkdb
Some other helpful commands:
List all user accounts
pure-pw list
Show a particular account details
pure-pw show dave
List all active users
pure-ftpwho
Reset User Password
pure-pw passwd dave
Delete User
pure-pw userdel dave
Modify User (give Dave an upload speed limit of 20)
pure-pw usermod dave -T 20
You should be able to log in as any user. However since we have not mounted the shares, no files will be visible. Some users should be able to upload files, but delete these temporary files before mounting your shares.
Next I'll go through my mounting techniques. I use binding too to simplify mounting.
Friday, February 5, 2010
HOWTO: Setup Pure-FTP on Ubuntu 9.10 with passive NAT support.
Please read my earlier posts on what I'm trying to accomplish. They will guide you to setup an Ubuntu 9.10 Server and give you an idea of my conventions. This is assuming you are using Ubuntu Server 9.10. Other flavors of linux may behave differently. The majority of my guidance on this came from ubuntu howto. My real work came from putting the other pieces together to meet my particular needs. Namely, the other 5 posts in the series.
Login and use sudo su again
apt-get install pure-ftpd
Now you should be able to connect to your FTP on port 21 at the server IP using your username and password. we are not ready to connect from the outside yet.
Setup all the pure-ftp settings. These setting files for pure-ftp work differently than what the pure documentation indicates. This may just be an Ubuntu thing. In the end, these files are 'translated' into command line switches.
Each line simply writes a value into the file. You can do the same by opening the file with nano and typing the value on the first line. Some setting files already exist and they should remain as they also contain important settings.
cd /etc/pure-ftpd/conf
Security Related Settings:
echo 99 > MaxDiskUsage
You can lower this but keep some setting here or someone could crash your server by filling the disk.
echo no > PAMAuthentication
echo 20 > MaxClientsNumber
You can change this but don't get too high. Be realistic with your bandwidth and server power.
echo 4 > MaxClientsPerIP
echo yes > ChrootEveryone
echo yes > NoChmod
echo yes > ProhibitDotFilesRead
echo yes > ProhibitDotFilesWrite
Network Settings:
echo 183.22.182.3 > ForcePassiveIP
Your external IP. Assuming you are behind a NAT Router.
echo ,3421 > Bind
A port for your FTP server. 21 is the standard but I change mine to keep them guessing. The comma is intentional.
echo 60000 60100 > PassivePortRange
For NAT forwarding issues you need to set this. Make sure your range supports 2x MaxClientsNumber. This and the Bind setting will be used on your router. write them down.
Misc Setting:
echo yes > BrokenClientsCompatibility
Finally restart your FTP server:
/etc/init.d/pure-ftpd restart
Here is my output from the command above.
Restarting ftp server: Running: /usr/sbin/pure-ftpd -l puredb:/etc/pure-ftpd/pureftpd.pdb -x -O clf:/var/log/pure-ftpd/transfer.log -u 1000 -S ,3421 -c 20 -k 99 -C 4 -P 183.22.182.3 -X -b -8 UTF-8 -Y 1 -A -E -R -p 60000:60100 -B
You can now go into your router and forward the main port (3421) and the passive port range (60000-60100) to your server IP (192.168.1.99).
Test your system from outside of your network if possible.
In the next post I will show you how to setup some virtual users with shared folder access.
Thursday, February 4, 2010
HOWTO: Set up Ubuntu 9.10 Server with SSH and Static IP
If you read earlier I have strange requirements for my FTP needs. While I'm still working out the kinks I have solved many problems with Samba, shared access, groups and more using Pure-FTP and Ubuntu Server. All of this is now running on my new mini server which I built last week for $219 shipped.
I'm not going to jump into any particular step in too much detail (it would make a book) but I will try to note on a few things. Other steps are just listed.
Install Ubuntu Server edition.
Start the server install and on many of the prompts, just choose the logical or default choice. However here are a few that some may get confused with.
After installation is finished reboot the system.
Logging In via SSH
I choose to keep the server headless (no monitor, keyboard, mouse, etc.) So all that is plugged into the computer is a network cable and power. It can help the computer boot faster if you go into the bios and turn off booting to other devices except for the primary drive. It also helps improve the physical security a little. Using this computer headless means that we need to connect via SSH. To do this you can download putty for free. If you have Ubuntu as your desktop you can find putty in your Add remove Programs.
The next step is to find out what the IP of the server is. I simply go to my router and it lists it.
Using Putty, just type in the IP of the server. You will accept the certificate then you are connected. Now log in with the name and password you created during the install.
Commands/text that should be typed will be italicized. Perform all actions in sequence.
Switch to root/administrator:
sudo su
Upgrade your System
You will want to do this when ever you login via putty and you see packages are ready to be installed.
apt-get upgrade
If you see some packages are bypassed then you need to use this also.
apt-get dist-upgrade
I recommend rebooting if you used apt-get dist-upgrade. There are other ways to apply certain settings instead of rebooting, but I just default to a reboot elsewhere.
reboot now
Don't forget to switch to root if you rebooted
sudo su
Change to a Static IP. I only have one network interface. Yours may be different. Your network IP settings may be different too.
nano /etc/network/interfaces
Change the last line dhcp to static. Mine is now iface eth0 inet static
Then add the following lines to the end.
address 192.168.1.99
netmask 255.255.255.0
broadcast 192.168.1.255
network 192.168.1.0
gateway 192.168.1.1
Then press control-o to save and press enter to keep the current name.
Then press control-x to exit
From now on it is assumed you will save and exit nano on your own.
nano /etc/hosts
Change the ip on the second line to the address you used above. My hosts file starts like this (atom is the name of the computer):
127.0.0.1 local host
192.168.1.99 atom
At the bottom, add any ip's for any file servers or other network resources you may need to access followed by the system name.
192.168.1.97 worldbook-work
192.168.1.98 worldbook-media
save and exit.
/etc/init.d/networking restart
At this point your putty window should stop working. close putty and start a new window for the new IP. You will need to accept the certificate again.
Congrats. You now have a server setup and ready to work. Now you need to give it something to do. In this case I'm going to make mine serve FTP. Check out the next post where I install and configure Pure FTP with security settings and passive NAT support.
I'm not going to jump into any particular step in too much detail (it would make a book) but I will try to note on a few things. Other steps are just listed.
Install Ubuntu Server edition.
Start the server install and on many of the prompts, just choose the logical or default choice. However here are a few that some may get confused with.
- For the disk partitioning Choose Guided - Use Entire Disk. Do not choose the default LVM option unless you know what it is. LVM disks are harder to clone and some disk utilities do not work with them.
- For proxy settings Leave blank unless you know this for sure.
- For Automatic Updates Choose Manual Updates
- For Packages Choose SSH Server and no others. You can always add more later, but get this working first.
After installation is finished reboot the system.
Logging In via SSH
I choose to keep the server headless (no monitor, keyboard, mouse, etc.) So all that is plugged into the computer is a network cable and power. It can help the computer boot faster if you go into the bios and turn off booting to other devices except for the primary drive. It also helps improve the physical security a little. Using this computer headless means that we need to connect via SSH. To do this you can download putty for free. If you have Ubuntu as your desktop you can find putty in your Add remove Programs.
The next step is to find out what the IP of the server is. I simply go to my router and it lists it.
Using Putty, just type in the IP of the server. You will accept the certificate then you are connected. Now log in with the name and password you created during the install.
Commands/text that should be typed will be italicized. Perform all actions in sequence.
Switch to root/administrator:
sudo su
Upgrade your System
You will want to do this when ever you login via putty and you see packages are ready to be installed.
apt-get upgrade
If you see some packages are bypassed then you need to use this also.
apt-get dist-upgrade
I recommend rebooting if you used apt-get dist-upgrade. There are other ways to apply certain settings instead of rebooting, but I just default to a reboot elsewhere.
reboot now
Don't forget to switch to root if you rebooted
sudo su
Change to a Static IP. I only have one network interface. Yours may be different. Your network IP settings may be different too.
nano /etc/network/interfaces
Change the last line dhcp to static. Mine is now iface eth0 inet static
Then add the following lines to the end.
address 192.168.1.99
netmask 255.255.255.0
broadcast 192.168.1.255
network 192.168.1.0
gateway 192.168.1.1
Then press control-o to save and press enter to keep the current name.
Then press control-x to exit
From now on it is assumed you will save and exit nano on your own.
nano /etc/hosts
Change the ip on the second line to the address you used above. My hosts file starts like this (atom is the name of the computer):
127.0.0.1 local host
192.168.1.99 atom
At the bottom, add any ip's for any file servers or other network resources you may need to access followed by the system name.
192.168.1.97 worldbook-work
192.168.1.98 worldbook-media
save and exit.
/etc/init.d/networking restart
At this point your putty window should stop working. close putty and start a new window for the new IP. You will need to accept the certificate again.
Congrats. You now have a server setup and ready to work. Now you need to give it something to do. In this case I'm going to make mine serve FTP. Check out the next post where I install and configure Pure FTP with security settings and passive NAT support.
Wednesday, February 3, 2010
HOWTO: Set up a versatile FTP server with Pure-FTP and Ubuntu 9.10 Server
Over the next several posts I am going to give you the steps I used to setup my Pure FTP server. I have some requirements that others may have and I feel you could benefit from parts of it too. Here are the broad details with hypothetical names and purposes to make explaining the situation easier.
I have two network shared devices called worldbook-work and worldbook-media. I will refer to these as work and media respectively. Work is used by my company as an information store. Users will need to read and write to it. Media has two separate shares on it. One for music and one for videos. I have this to allow family access remotely. There is no need to write to this remotely so the share account on the device only allows reading as another layer of security. Finally I need to support a dropbox for a photography group I am in. The photographers will drop their pictures off and the administrator will log in, download the pictures and put them on another website, the administrator will delete the files once retrieved. Photographers should not be able to see or modify another photographer's files. I am just using local server disk for this since the files are transitory and the original photographer can send another copy if a problem arises.
Work users will need full access to work. Family will need read access to media. I will need full access to work and read access to media. and I have users who need to use the dropbox as described above. All while most shares are over a SMB mount.
Here are the coming posts to show you what I did.
To do/desires:
I have two network shared devices called worldbook-work and worldbook-media. I will refer to these as work and media respectively. Work is used by my company as an information store. Users will need to read and write to it. Media has two separate shares on it. One for music and one for videos. I have this to allow family access remotely. There is no need to write to this remotely so the share account on the device only allows reading as another layer of security. Finally I need to support a dropbox for a photography group I am in. The photographers will drop their pictures off and the administrator will log in, download the pictures and put them on another website, the administrator will delete the files once retrieved. Photographers should not be able to see or modify another photographer's files. I am just using local server disk for this since the files are transitory and the original photographer can send another copy if a problem arises.
Work users will need full access to work. Family will need read access to media. I will need full access to work and read access to media. and I have users who need to use the dropbox as described above. All while most shares are over a SMB mount.
Here are the coming posts to show you what I did.
- Setting up Ubuntu Server with Static IP, network device aliases, and SSH support.
- Setting up Pure-FTP server with Passive NAT support, and proper security precautions
- Setting up a directory structure with permissions and virtual users with bandwidth control
- Setting up mounts with credential files for added security and binding to share mounts amoung many folders.
- Setting up TLS security to enable encrypted FTP. Referred to as FTPS.
To do/desires:
- Force TLS for all users except dropbox users.
- send an email after a file is sent to dropbox, but no other share
- (Not possible without a separate server process from what I can tell.)
- Refine directory management and permissions. Perhaps have a virtual layer of permissions on top of existing directory permissions.
- (Not possible without a software change. Though it should be possible to code with dot files in folders.)
- Allow each virtual user to have a virtual private folder.
- (I have no clue or even a suggestion for this)
Tuesday, February 2, 2010
Jailbreaking the Iphone
I love my iPhone and the last thing I thought I would do would be to Jailbreak the iPhone. I wasn't even sure what it really meant. However my computer lost my itunes library for the second time in a row which left me totally unprepared without any kind of backup (it's a long story). I am so tired of rebuilding my itunes library and fiddling with the stuff that would be so much easier without all this 'protection'. I'm certain I have lost several games and music purchases. But what really gets me is loosing my app data. All those wasted hours on games with accomplishments I'm certain I will not be able to do again are very important to me. Ohh yeah, I've had to fill in data a couple of times into mSecure and I sure don't want to do that again either.
Well it turns out there is an easy way to backup your app data. But it's only available in Jailbreak land. It's called Chronos. Why apple doesn't provide some means of backing up just app data is beyond me. A full restore can be destructive to certain things when all you need is to backup your app data, sync with a new itunes library, and restore app data. There are other great improvements available for Jailbroken iphones which I may explore in a future post.
The amazing thing for Jail Breaking the iphone is it is surprisingly easy and very low risk. Simply download the utility. Plug in your Iphone, and click one button. As far as risk, Jailbreaking doesn't modify the phone, it just gives you a means to install new applications. The applications you choose to install would bear the risk, much like installing applications on your computer. In the worse case scenario, you would have to restore the iPhone, but very few have had that issue.
If you want to learn more, post a comment and I'll try to write about it.
Monday, February 1, 2010
Ten Tips for Keeping Windows Fast and Secure (Part 3 of 3)
If you missed the first two parts, please go read them now.
8. Use an active virus scanner and spyware blocker.
There isn't much of an explanation for needed this. In the windows world this is required. On Ubuntu, virus scanners and spyware scanners are not needed due to other measures in place to help prevent infections. However, for Windows, ensure the definitions are updated daily and don't let your scanners expire. You need to stay up to date.
9. Don't click links in emails even if you know the source.
This is true for any OS, but even more so with Windows. In every OS, links in emails can trick you to reveal your passwords and other private data to bad guys. In windows, they can also infect your computer easily. Also watch out for attachments. If you get a file from someone you know, it can still be bad. If it's a video, or a picture ask them to put it on a popular site like youtube, flikr, or facebook. Then go view it there. All it takes is a new virus which infects that type of file to get in their system, then it will be in your system. Using a known third party doesn't eliminate the risk completely, but it reduces the risk.
10. Don't be an administrator.
Many of us share a computer with family. It can be a pain in the butt, but to help keep the bad guys out of the computer give each family member their own account. Make sure your family member is not also an administrator. In fact, it's better if you create a separate account for yourself too which isn't an administrator. When you need to install a new application, switch to the administrator account and run the install. Some applications won't play nicely with this and expect administrator privileges. Really if they can't get these security requirements right, do you expect them to get it right in other ways?
If you enjoy this blog, please click the follow button!
Sunday, January 31, 2010
Ten Tips for Keeping Windows Fast and Secure (Part 2 of 3)
5. Don't install free or cheap applications unless it's open source.
There are some exceptions to this too such as AVG Virus Scanner . However most free or cheap closed source applications want something in return for that low price. Perhaps they give you spyware, or they will start harassing you to buy a license. Even if this is not the case the coder can unintentionally create a vulnerability or fail to patch a vulnerability. Adobe Acrobat Reader is a free application supported by a major software company and even that has introduced vulnerabilities. Open source applications are exceptions because they can be maintained and critiqued by others. With all software though you have to justify the risk with the rewards. These applications also have to be updated, windows will not do it for you. Ubuntu will keep all your applications up to date which is a huge plus for linux security.
6. Don't install extra applications.
When installing any application, use advanced install and un-check any offer to install additional applications. Even applications from Adobe and Apple ask to install something else, always say NO. If you are installing iTunes, don't accept Safari too. Don't install any software if you aren't going to use it.
7. Turn off nearly every program that is running near the clock.
Programs running in the background are a huge risk because they can be listening for or communicating with the internet without you knowing. Each one also takes a little speed away from the computer. While turning all all unneeded background tasks can require a degree in computers, most of us can get the tasks near the clock to stop running. Of course there are windows provided icons and your virus scanner that must remain. But you don't need that office toolbar, Adobe updater, etc.
There are some exceptions to this too such as AVG Virus Scanner
6. Don't install extra applications.
When installing any application, use advanced install and un-check any offer to install additional applications. Even applications from Adobe and Apple ask to install something else, always say NO. If you are installing iTunes, don't accept Safari too. Don't install any software if you aren't going to use it.
7. Turn off nearly every program that is running near the clock.
Programs running in the background are a huge risk because they can be listening for or communicating with the internet without you knowing. Each one also takes a little speed away from the computer. While turning all all unneeded background tasks can require a degree in computers, most of us can get the tasks near the clock to stop running. Of course there are windows provided icons and your virus scanner that must remain. But you don't need that office toolbar, Adobe updater, etc.
Saturday, January 30, 2010
Ten Tips for Keeping Windows Fast and Secure (Part 1 of 3)
1. Use Firefox for internet browsing.
Internet Explorer has been one of the weakest points in windows security. Using Firefox eliminates a huge portion of risk and supports web standards better than internet explorer. Did you know most websites run special compatibility code just for internet explorer?
2. Turn on automatic updates. Ensure it runs daily.
Many people don't even turn on automatic updates. And if you aren't updating because your Microsoft Windows is an illegal copy, you are even more vulnerable. If you need a legal copy and have more than one computer in the family you can save money by getting a family pack . If you can not afford it, switch to Ubuntu for free.
3. Ensure you choose shutdown and install updates before turning off your computer.
Every night you should choose to shutdown and install updates. This ensures updates are getting installed, it also reduces the number of lockups and slowdowns you can have from running windows too long. Also you are helping to stay green by not keeping the computer on all night.
4. Don't install browser toolbars or plugins.
There are some exceptions but toolbars and plugins in general are another point of vulnerabilities and web speed issues. They just aren't worth the risk no matter how cute they are. Plugin exceptions are flash and ad blockers.
Internet Explorer has been one of the weakest points in windows security. Using Firefox eliminates a huge portion of risk and supports web standards better than internet explorer. Did you know most websites run special compatibility code just for internet explorer?
2. Turn on automatic updates. Ensure it runs daily.
Many people don't even turn on automatic updates. And if you aren't updating because your Microsoft Windows is an illegal copy, you are even more vulnerable. If you need a legal copy and have more than one computer in the family you can save money by getting a family pack
3. Ensure you choose shutdown and install updates before turning off your computer.
Every night you should choose to shutdown and install updates. This ensures updates are getting installed, it also reduces the number of lockups and slowdowns you can have from running windows too long. Also you are helping to stay green by not keeping the computer on all night.
4. Don't install browser toolbars or plugins.
There are some exceptions but toolbars and plugins in general are another point of vulnerabilities and web speed issues. They just aren't worth the risk no matter how cute they are. Plugin exceptions are flash and ad blockers.
Friday, January 29, 2010
Building a Mini Computer at a Mini Price
I have been excited by the idea of Mini ITX computers recently. These motherboards usually have everything built on them with the exception of drives and memory. So put one of these in a case, add some drives and a stick of memory and viola, you have a great little computer. (hopefully cheap too).
Mini ITX motherboards start at around $60 for older models and go up to about $200 for some graphics beef. However I have really liked Intel's newest offering (Released 12/09). The Intel D510MO Mini ITX. This latest motherboard boasts a 64bit Dual core hyper-threaded 1.6ghz CPU. It's not the fastest but it draws under 20watts of power and is passively cooled, meaning no fans are needed. The price of this board is supposed to be around $75 but this early in the release, the cheapest I could get one is $79 + $9 shipping from mini-box.com. Mini-Box also sells one of the smallest ITX cases too, the M350.
With this design it's possible to build a decent computer with no moving parts. I however decided I would spend a little less and opted for a 250GB WD Blue hard drive and a Rosewill Mini ITX case. Solid State drives are still a little pricey.
Since my purpose is for a low power linux server with nice upgrade options, I skipped the DVD drive. I have an external DVD I can use to load the OS and after that all upgrades and new software is installed online.
I managed to build the entire computer for $220. Though I know some of these prices may fluctuate and it could cost up to $260 for the same computer depending on the day of the week.
Here is my parts list (shipping included) as well as possible upgrade options for those who want them:
Intel D510MO Motherboard/CPU $90
Rosewill Mini ITX Case $40
Crucial 2GB DDR2 800 $40
Western Digital 250GB Blue SATA drive $45
$45
Ubuntu Linux 9.10 - FREE!
Total $215
Optional Upgrades:
Internal Mini PCI Express Wireless $15
Wireless Antena - Get the antena and pigtail cable from the bottom of the wireless card page. about $10
Slim Internal DVD Reader/Writer $45
Broadcom HD Mini PCI-E decoder Card $25 on ebay.
m350 Case and powersupply $79
Mini ITX motherboards start at around $60 for older models and go up to about $200 for some graphics beef. However I have really liked Intel's newest offering (Released 12/09). The Intel D510MO Mini ITX. This latest motherboard boasts a 64bit Dual core hyper-threaded 1.6ghz CPU. It's not the fastest but it draws under 20watts of power and is passively cooled, meaning no fans are needed. The price of this board is supposed to be around $75 but this early in the release, the cheapest I could get one is $79 + $9 shipping from mini-box.com. Mini-Box also sells one of the smallest ITX cases too, the M350.
With this design it's possible to build a decent computer with no moving parts. I however decided I would spend a little less and opted for a 250GB WD Blue hard drive and a Rosewill Mini ITX case. Solid State drives are still a little pricey.
Since my purpose is for a low power linux server with nice upgrade options, I skipped the DVD drive. I have an external DVD I can use to load the OS and after that all upgrades and new software is installed online.
I managed to build the entire computer for $220. Though I know some of these prices may fluctuate and it could cost up to $260 for the same computer depending on the day of the week.
Here is my parts list (shipping included) as well as possible upgrade options for those who want them:
Intel D510MO Motherboard/CPU $90
Rosewill Mini ITX Case $40
Crucial 2GB DDR2 800 $40
Western Digital 250GB Blue SATA drive
Ubuntu Linux 9.10 - FREE!
Total $215
Optional Upgrades:
Internal Mini PCI Express Wireless $15
Wireless Antena - Get the antena and pigtail cable from the bottom of the wireless card page. about $10
Slim Internal DVD
Broadcom HD Mini PCI-E decoder Card $25 on ebay.
m350 Case and powersupply $79
Thursday, January 28, 2010
Security Camera Recommendations
There have been some break-ins in a few neighborhoods around my house. Mostly just smash and grabs with stuff left in cars. My Wife had her ipod stolen and a dvd player two years ago, so I have been personally affected.
Since then I have been on the look out for outdoor security cameras which have a decent image at night and don't cost a fortune. I've not been happy with many of the options I have found but after quite a bit of research I have narrowed it down to two cameras.
Both cameras are capable for outdoors. Both can perform at night. Though the Panasonic may need SOME light from a porch light.
Panasonic bb-hcm531
Offers Pan/Tilt controls.
Power Over Ethernet (PoE)
Must buy a PoE adapter or switch
Sample Images: http://www.amazon.com/gp/customer-media/product-gallery/B000P7X438/ref=cm_ciu_pdp_images_1?ie=UTF8&index=1
Y-Cam Black - $269 or $999 for 4
http://www.y-cam.com/y-cam-black
Wireless networking, just need power.
No Pan/Tilt. Its fixed
IR LED for night illumination
Must buy outdoor housing for $99 more per camera.
Sample Live Camera here: http://ycam3.dtdns.net:8150/en/login.asp
Login is guest Password guest
At this point I don't see the need for pan tilt because once it's set there should be little reason to move it. I've looked for other options but with the low light requirement and outdoor mounting you can't get much better image wise without spending at least $1200.
The cameras can serve the video themselves over the internet, but I'm going to try to use ZoneMinder. A free security application which can control multiple cameras.
As of now, I'm going to buy the Y-Cam Black because it seems to be easier to install and has a true night vision mode. The pan and tilt just isn't that important for what I need. To install the Y-Cam properly you should run the power cable through the soffet(sp) and in the attic run an outlet from the nearest junction box. I'm thinking of avoiding ladders and just mounting it outside a window and run the power through the window. We'll see.
Wednesday, January 27, 2010
The big photography question.
I have many people ask me what they should buy for a digital SLR or for a lens. If you are new to SLR photography or if you care about your budget, I recommend the Canon Rebel XSi. 
Why Canon?
Because they are generally cheaper than the other manufacturers. Sure you can get a good deal on a body from other manufacturers but you will start to pay for it later when you want to expand. Another benefit from using Canon is more choices. Canon has more lens options and accessories than any other manufacturer.
Why a Rebel XSi?
If you are bothering to ask what to get, it means you don't know what you need. Until you know you need a very specific feature and you know you will actually use that feature, don't buy it. The easiest thing you can do is over buy on the body and skimp on the lens. Don't buy a Canon 50D or 5DII
 if you don't know what truly makes it different in a practical manner. Your pictures will NOT look better and your wallet will be much lighter. The other rule is don't get sucked into megapixels. 3 Megapixels can make a decent 8x10 and after 5 megapixels it will be hard to tell the difference between that and an 8x10 from a similar quality 22 megapixel camera. The rebel XSi is an outstanding camera. It's pictures will look just as good as the pictures from a 50D or a 5DII which is why the others are a waste.
Video?
I don't buy still cameras for video and I don't buy video cameras to take stills. These cameras aren't made for that. The controls and handling are messy, memory is limited, and battery life won't hold up the same. In the end, I just say don't buy camera x because the manufacturer also decided to put video into it. There are videography enthusiasts who buy some of the recent SLRs just to use them for video. But those people are buying only for the video and not the still. It's different, they have a very specific need and they have researched enough to know how one of these SLRs will help them and in which ways they will hinder them.
Which lens?
If you have the money (because you decided to save money and buy the XSi) I would put money into the lens. The first thing a beginner wants out of an SLR is super telephoto zoom. They see some gigantic lenses on an SLR and assume that they really 'zoom' in. This is not always the case. Lenses get bigger as their 'quality' improves. They also start to cost a fortune! Either way, here are some recommendations:
If you don't have extra money, just stick with the kit lens until you have money and know what you are missing.
If these prices scare you, perhaps you should consider staying with a high end point and shoot camera. One of my favorites is the Canon s90. For photographers, all the lenses above are considered inexpensive. Some readers may notice a slight contradiction between my lens recommendations and body recommendations. Yes many people get outstanding pictures from the pure consumer lenses like 70-300 or 18-55
 , etc. However if you really want to do some of the more creative work with photography you need to avoid buying your lenses at big box stores.
Investing:
Also lenses are more of an investment. They don't loose value like a Camera will and you will generally keep them longer than your camera. I have had a lens which I bought for $800, used it for an entire year, and sold it to someone for $750 on ebay. Basically I paid $50 to rent a $800 lens for an entire year. And no it wasn't luck. Lenses can go up in value too. Exception: The cheap kit lenses, ie 70-300, always drop in value the instant you buy them. Camera bodies always drop in value in relation to how many newer models there are from the same line.
Enjoy your camera.
Why Canon?
Because they are generally cheaper than the other manufacturers. Sure you can get a good deal on a body from other manufacturers but you will start to pay for it later when you want to expand. Another benefit from using Canon is more choices. Canon has more lens options and accessories than any other manufacturer.
Why a Rebel XSi?
If you are bothering to ask what to get, it means you don't know what you need. Until you know you need a very specific feature and you know you will actually use that feature, don't buy it. The easiest thing you can do is over buy on the body and skimp on the lens. Don't buy a Canon 50D
Video?
I don't buy still cameras for video and I don't buy video cameras to take stills. These cameras aren't made for that. The controls and handling are messy, memory is limited, and battery life won't hold up the same. In the end, I just say don't buy camera x because the manufacturer also decided to put video into it. There are videography enthusiasts who buy some of the recent SLRs just to use them for video. But those people are buying only for the video and not the still. It's different, they have a very specific need and they have researched enough to know how one of these SLRs will help them and in which ways they will hinder them.
Which lens?
If you have the money (because you decided to save money and buy the XSi) I would put money into the lens. The first thing a beginner wants out of an SLR is super telephoto zoom. They see some gigantic lenses on an SLR and assume that they really 'zoom' in. This is not always the case. Lenses get bigger as their 'quality' improves. They also start to cost a fortune! Either way, here are some recommendations:
If you don't have extra money, just stick with the kit lens until you have money and know what you are missing.
- Wide Zoom - Canon 10-22
- Standard Zoom - Tamron 28-75mm f2.8
- Telephoto Zoom - Either Canon 70-200 f4
or Tamron 70-200 f2.8
If these prices scare you, perhaps you should consider staying with a high end point and shoot camera. One of my favorites is the Canon s90
Investing:
Also lenses are more of an investment. They don't loose value like a Camera will and you will generally keep them longer than your camera. I have had a lens which I bought for $800, used it for an entire year, and sold it to someone for $750 on ebay. Basically I paid $50 to rent a $800 lens for an entire year. And no it wasn't luck. Lenses can go up in value too. Exception: The cheap kit lenses, ie 70-300, always drop in value the instant you buy them. Camera bodies always drop in value in relation to how many newer models there are from the same line.
Enjoy your camera.
Subscribe to:
Posts (Atom)