Showing posts with label Linux. Show all posts

Wednesday, July 13, 2011

AirPrint Server with Ubuntu - The easy way

With an AirPrint enabled printer, you can easily print over wifi from your Iphone, Ipad, and Ipod Touch.

If you don't have a printer, or your printer is on its last leg, the easy way is to buy a $69 HP Wifi Printer, Scanner, and Fax.


However, many of us like our printers and don't want to buy another. So here is the real easy way to make your old printer AirPrint compatible.

You need to have:

  • Ubuntu installed (10.10 was tested)
  • The printer working in ubuntu. Usually not difficult, but it is beyond the scope of this blog post.

Steps:

Copy and paste this line into the terminal. You can find the terminal by clicking applications, accessories, terminal.

sudo add-apt-repository ppa:hughescih/ppa && sudo apt-get update && sudo apt-get install airprint-daemon
This will ask for your password to continue. After entering the password, you will see hundreds of lines fly by.
Finally open your printing manager by clicking System, Administration, Printing
Open the printer server settings by clicking Server, Settings
Check the box for 'Publish shared printers connected to this system'
Check the box for 'Allow printing from the Internet'
Click Ok.

Thats it. You can now print from your iphone, etc.

This is based on the blog post here: http://gtk-apps.org/content/show.php/Apple+AirPrint+Support+for+Ubuntu?content=136756

Wednesday, March 24, 2010

DIY Personalized Email Marketing with OpenOffice.org for Free

The Problem and a Marketing Tip:
When I photograph a wedding, I will place cards on the tables for guests to write in their name and email address. I tell the guests that I will notify them as soon as the pictures are online. So far, guests are happy about it and they actually thank me for the doing this for them. I make a point to only mail once to avoid being spam-y. Well, I like the messages to list their name in the salutation. 'Hi Joe' just works better for me than something less personable. Tools and online services for this are expensive. So digging around I figured out how to do it with OpenOffice.org for FREE.

Keep reading if you want the techie details. If not, Follow Me, to get more photography and tech tips. This will be a long one. EDIT: These instructions are made for Ubuntu / Linux. You may need to adjust for windows.


Setup:
  • Ensure your default mail client is configured to handle mail. If you use webmail, configure your email client to be able to send to the web account before continuing.
  • Setup Your Mail Merge Email account in OpenOffice Writer by choosing Tools, Options. 
    • Then expand the OpenOffice.org Writer settings. 
    • Finally click Mail Merge E-mail and fill in your values.


Create SpreadSheet:
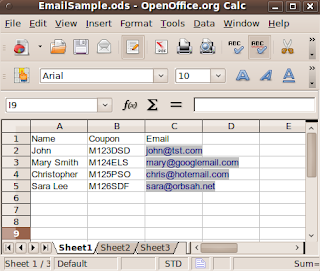
Create spreadsheet with Row1 having column titles. Two columns you will likely need are Name and Email but feel free to have others.


Create Message Template:
  • Create a letter you would like to send without names or other merged values.
  • Put the mouse in the location you would like the first field.
  • Goto Insert, fields, Other or press Ctrl-F2
  • On the Database tab, select mail merge fields in the Type Box

  • Click Browse and locate your spreadsheet.
  • After choosing your spreadsheet, it should now appear in the list of databases.
  • Expand the database and sheet1.

  • Click on the field you want to use and click insert. the field should now appear in your document.

  • Without closing the Fields window you can click in other areas of your document and insert other fields.
  • You probably don't want to insert the email address into the message body. That will come later.


MailMerge Wizard:
Once you are done you can open the mail merge wizard. Tools, MailMerge Wizard. The wizard divides the task into 8 steps. Most of which you will skip.
  • Step 1. Leave as Current Document.

  • Step 2. Choose Email Message
  • Step 3. Select your database for the address list.

  • Step 4. Skip. You have already completed this by inserting fields. This part of the wizard is clumsy so we did it a better way.
  • Step 5. Nothing to do here. It should be grayed out.
  • Step 6. Nothing to do here, but you can click the arrows and actually see your data in your message template.

  • Step 7. Nothing to do here, but at this point OpenOffice will create a new document with all your merged data. If you cancel now, it will close this temporary document, and take you back to your template.
  • Step 8. Select the last option, Send merged document as E-Mail.
    • For To: Select your email address field.
    • For Subject: Type any Subject
    • Send As: I leave as HTML, choose what you need.
    • Click Send Documents


If all goes well you will see a progress bar complete the sending. You should be able to check your Sent Items folder and see all the messages. If you mistyped any email addresses, you will probably get a failure notification by email just for the bad addressess.

Cleaning Up:
If you use this email marketing a lot, you may start to build a lot of databases. To remove databases from the OpenOffice list (this doesn't delete the database file):
  • Click on View, Datasources (or press F4). 
  • Right-Click in the database box and click Registered Databases. 

  • In the new window select the databases you created and delete them. Do not delete the databases the system created, such as Bibliography.


Thanks for reading. Hopefully it all went smooth for you. I wish I could have found instructions like these when I started... Enjoy!
Don't spam anyone and before sending a large list of emails ensure you follow the rules of your email provider or they may drop your account. For example, Gmail limits you to 500 emails per day. And if you get a large number of failed deliveries they may temporarily disable your account.

Ps. I've tried to include a small graphics in my emails, but they don't make it to the email system. If you are handy with HTML, it may be better to link to an internet hosted graphic.

Sunday, March 21, 2010

Change Default Operating System at Boot for Ubuntu

Suprisingly the solutions to this problem vary wildly. Ubuntu is using the new Grub2 for booting and not too many users know the proper way to change the boot order. However after digging through all the answers I have what I believe is the best solution.

My particular problem is because I just built a new i7 920 system for my grandfather. He paid for Windows 7, but at the last minute I talked him into trying an ubuntu dual boot. Part of this, however is I need windows 7 to be the default choice or he will get frustrated.

Well, here is the adventure. First, the old way to update the boot is by simply modifying menu.lst. This file no longer exists. Then the people who are used to this try updating grub.cfg, because it seems similar to menu.lst. However the system will build a new grub.cfg when it needs to and overwrite any changes.

The closest correct answer is modifying /etc/default/grub and changing GRUB_DEFAULT=0 to the correct number. However this will present problems if the grub list ever grows or shrinks, such as when a new kernel is installed.

I've seen a few other complicated, but unreliable options too. But I'm not going into all the the wrong ways. Lets look at the correct way to change the default boot item.

Step 1, Figure out the exact name of the OS you want to boot. Either write it down when you reboot or type this in a terminal
cat /boot/grub/grub.cfg
Scroll up to find the name. Mine is 'Windows 7 (loader) (on /dev/sda1)'

Copy and paste it or just write it down. Just make sure you get it exact, even the capitalization.

Step 2, open the /etc/default/grub file for editing, here is my favorite command:
sudo nano /etc/default/grub
If you are more of a point and click person try this:
gksudo gedit /etc/default/grub
Step 3, find the line with GRUB_DEFAULT=0 and change the 0 to your OS. Be sure to use double quotes around your OS because it has spaces in the name.
Here is my GRUB_DEFAULT line for my grandfather's computer:
GRUB_DEFAULT="Windows 7 (loader) (on /dev/sda1)"
If you are trying to do this for windows 7, chances are your line will match mine exactly. Be sure to save your file and exit your editor.

Last step! You need to update your grub menu (process the changes we made). Just type into a terminal:
sudo update-grub

That is it. Only 4 steps and a headache saver.

FYI, most of the wrong ways to update grub came from here: http://www.linux.com/community/blogs/changing-the-default-boot-with-ubuntu-910-grub-2.html, though this eventually led me to the right answer. 

Tuesday, March 9, 2010

1024bit RSA cracked in 100 hours. What is coming next?

Here is a very technical read on the attack used on RSA http://www.eecs.umich.edu/~valeria/research/publications/DATE10RSA.pdf. I made it about half way though, see how far you can go... lol. Anyways the summary is by messing with the voltage supply they are able to introduce single bit errors into the RSA algorithm, then they can take these bad outputs and analyze them to reveal the secret key.

They are able to do this without modifying or accessing the internal system components. So in effect the attack leaves no signs of tampering. They performed this particular attack against linux and OpenSSL.

WOW. Just remember security isn't about how strong your front door is.